
Unlocking the Power of Embedded Swift: Your Step-by-Step Roadmap
Introduction
Swift, the general-purpose programming language beloved by Apple developers, is expanding its reach into the embedded systems world. While this feature hasn’t been officially released yet, it’s already demonstrating significant potential. Much like Swift’s move into server-side development a few years ago, this expansion could open up exciting new opportunities for Swift developers.
This development is both thrilling and somewhat intimidating. The environment for embedded development is markedly different from the familiar territory of mobile app development, presenting a new set of challenges and learning curves.
In this article, we’ll explore this emerging domain and provide a practical guide to help interested developers get started with embedded Swift. Whether you’re an experienced Swift programmer looking to broaden your skills or a curious newcomer, we’ll walk you through the essentials to help you navigate this new frontier.
Hardware setup
This tutorial focuses on the Raspberry Pi Pico W microcontroller. While the steps are tailored for this specific model, users with different microcontrollers can adapt the instructions as needed.
When connecting your microcontroller to a computer, ensure you’re using a data-capable Micro USB cable. Some cables are designed for charging only and won’t allow data transfer, which is crucial for our setup process.
To flash new firmware or copy files to your Pico W:
-
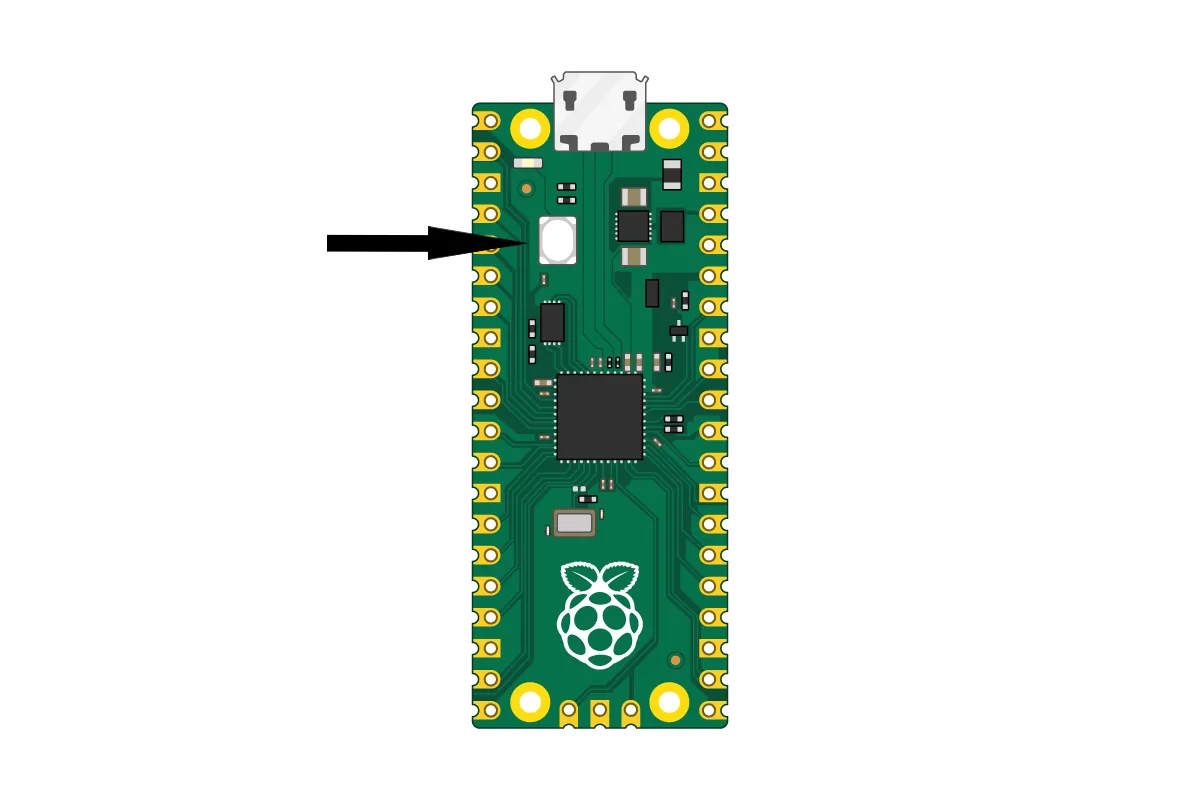
Locate the
BOOTSELbutton on your microcontroller like below: -
Press and hold the
BOOTSELbutton while connecting the Pico W to the computer. -
Once connected, the device should appear as a USB mass storage drive and we can copy file onto it.
Compatibility Note: Recent macOS versions may have issues recognizing the Pico W in boot mode or having difficulties copying file onto it. If you encounter problems, consider using a Windows machine for this step.
Setup development environment
Install Swift Toolchain
Download Swift release/6.0 Development Snapshots package and install it. We can also consider installing other versions of Swift that support embedded Swift. Check out more versions here.
After installation, run the following command to export TOOLCHAINS environment variable that will be used in the compiling step.
# Please modify <toolchain name> accordingly, which you can find in this folder /Library/Developer/Toolchains/
export TOOLCHAINS=$(plutil -extract CFBundleIdentifier raw /Library/Developer/Toolchains/<toolchain name>.xctoolchain/Info.plist)
Clone pico-sdk repo with submodules
git clone --recursive https://github.com/raspberrypi/pico-sdk.git
Install CMake
In terminal, use brew to install cmake .
brew install cmake
If don’t have brew command installed, need to install Homebrew first by running the following command. More details can be found here.
/bin/bash -c "$(curl -fsSL https://raw.githubusercontent.com/Homebrew/install/HEAD/install.sh)"
Install Arm Embedded Toolchain
Go to the Arm Embedded Toolchain website and download the right tar file for the system.
For Apple silicon laptops, download this one and this one for Apple Intel chip laptops. Simply extract them into a folder, which will be used in the following steps.
Clone code repos
Clone the sample code
Apple provided an embedded swift sample project here and we are going to compile and run the one for Pico W project in this repo. Clone the whole repo first using the following command.
git clone https://github.com/apple/swift-embedded-examples.git
Clone pico-examples repo(optional)
In the readme of the above sample code repo, this sample code repo was mentioned in order to verify the environment setup. If we just want to try the embedded Swift sample project, we can ignore this step.
git clone https://github.com/raspberrypi/pico-examples.git
Compile & run the sample projects
As mentioned in the readme, run the following command to compile the project.
$ cd pico-w-blink-sdk # This is under the sample code folder from Apple
$ export TOOLCHAINS='<toolchain-name>' # This is done in the installing Swift toolchain step
$ export PICO_BOARD=pico_w # This is your microcontroller type
$ export PICO_SDK_PATH='<path-to-your-pico-sdk>' # This is the folder of the pic-sdk
$ export PICO_TOOLCHAIN_PATH='<path-to-the-arm-toolchain>' # This is the folder of Arm Embedded Toolchain
$ cmake -B build -G Ninja .
$ cmake --build build
Please note, I had encountered the following error when I checked out the sample code at this commit 0783cc14f97b085e4e1c00df22cde50ca2c18eee .
My solution to it was to add this #define PICO_RP2040 1 into the bridge header.
When all went well, we would get the swift-blinky.uf2 file in the following folder. The next step is to copy this file onto our microcontrollers as mentioned in the Hardware setup section. Once finished copying, the microcontroller would automatically reboot and the LED would start flashing!
Going further
Congratulations! Now we are able to using Swift to program microcontrollers just using the Swift syntax that we all are familiar with.
The following example is to use [ws2812_program](http://Pico-Sensor-Kit-Code.zip) to drive a RGB LED. Also please refer to the code repo here.
enum PIO {
    static let pio0: UnsafeMutablePointer<pio_hw_t> = UnsafeMutablePointer(bitPattern: 0x50200000)!
}

@main
struct Main {
    static func main() {
        let WS2812_PIN: UInt32 = 22
        let sm: UInt32 = 0
        var program = ws2812_program
        let offset = pio_add_program(PIO.pio0, &program)

        stdio_init_all()
        ws2812_program_init(PIO.pio0, sm, UInt32(offset), WS2812_PIN, 800000, true)

        while true {
            for cnt in UInt32(0)...0xff {
                put_rgb(red: cnt, green: 0xff - cnt, blue: 0);
                sleep_ms(3)
            }
            for cnt in UInt32(0)...0xff {
                put_rgb(red: 0xff - cnt, green: 0, blue: cnt)
                sleep_ms(3)
            }
            for cnt in UInt32(0)...0xff {
                put_rgb(red: 0, green: cnt, blue: 0xff - cnt)
                sleep_ms(3);
            }
        }
    }

    static func put_rgb(red: UInt32, green: UInt32, blue: UInt32) {
        let mask = (green << 16) | (red << 8) | (blue << 0)
        pio_sm_put_blocking(PIO.pio0, 0, mask << 8)
    }
}
Please note, embedded Swift only supports a subset of the full Swift language feature. More details on this can be found here.
Of course, running sample projects is only the start. In order to develop more features using embedded Swift, Visual Studio Code and some of its extensions might be helpful.
Visual Studio Code
Follow the installation guide to install Visual Studio Code here.
Swift extension
Swift extension to Visual Studio Code gives us many cool features including code completion etc., which makes the development process just as smooth as working with Xcode.
Raspberry Pi Pico extension
This extension gives us the functionalities(shown in the below screenshot). For simplicity, we are not going to cover all these functionaries in this article.
Conclusion
Comparing writing programs for microcontroller using C, embedded Swift really shines due to its high level language features and the result is so amazing as we can see that the binary files it generates is just as good as what C can do. I hope this article will trigger your interest in this area and help you start your own cool projects with microcontrollers using embeded Swift.
Sharing is caring!