
How to develop Swift Macros
This tutorial is a step-by-step guide to develop Swift Macros. We will develop an attached Macro called Singleton , which helps reduce the tedious code of writing a singleton struct or type.
Singleton in Swift
For a proper singleton type definition, we usually need to make the initialiser private to prevent unintended instances of this type being created. Also we need to have a shared static instance that can be used.
In code, a singleton type definition would be like this.
struct SingletonStruct {
    private init() {}
    static let shared = Self()

    let name = "Tim Wang"
}
Then, we can access the shared instance using SingletonStruct.shared. The two lines of code private init() {} and static let shared = Self() are common to all the singleton definitions. If we write these code manually for each singleton type definitions, not only does it look repetitive, it’s error prone. Because if we forget the private access modifier on init , would end up with the chances of creating new instances of this singleton type. We will see how Swift Macros can help for this case.
New Macro package in Xcode
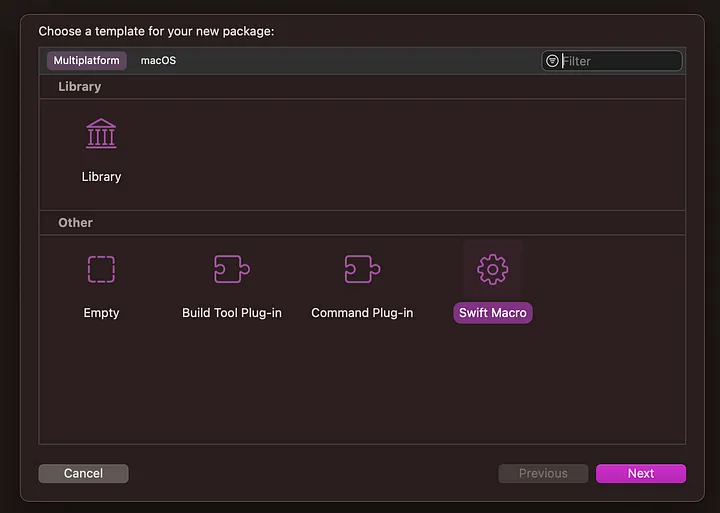
In Xcode, select File/New/Package menu item and select Swift Macro like below
New package for Swift Macro
This will create a Swift Macro template package. In the Package.swift there are four targets defined:
macro named MyMacroMacros: this is the target to hold the Macro expansion logic. We don’t need to import this into the code as the Macro logic is only needed in the compiling process.
target named MyMacro: this is the place to expose the Macro definition and is the target we need to import into the code where it is required.
executableTarget named MyMacroClient : this is the sample code using the Macro.
testTarget named MyMacroTests: this is the unit test code for the Macro.
 targets: [
        .macro(
            name: "MyMacroMacros",
            dependencies: [
                .product(name: "SwiftSyntaxMacros", package: "swift-syntax"),
                .product(name: "SwiftCompilerPlugin", package: "swift-syntax")
            ]
        ),
        .target(name: "MyMacro", dependencies: ["MyMacroMacros"]),

        .executableTarget(name: "MyMacroClient", dependencies: ["MyMacro"]),

        .testTarget(
            name: "MyMacroTests",
            dependencies: [
                "MyMacroMacros",
                .product(name: "SwiftSyntaxMacrosTestSupport", package: "swift-syntax"),
            ]
        ),
    ]
Update them to the names that you like, or just leave them for now to quickly start exploring.
Implement the Singleton Macro
Write the unit test
Let’s adopt test driven approach for this task to write expectations in the unit test first.
func testSingletonMacro() {
        assertMacroExpansion(
            """
            @singleton
            struct A {}
            """,
            expandedSource: """

            struct A {
                private init() {
                }
                static let shared = Self()
            }
            """,
            macros: testMacros
        )
    }

    func testPublicSingletonMacro() {
        assertMacroExpansion(
            """
            @singleton
            public struct A {}
            """,
            expandedSource: """

            public struct A {
                private init() {
                }
                public static let shared = Self()
            }
            """,
            macros: testMacros
        )
    }
We have two test methods here: one is for internal struct expansion and another for public struct. For the later case, we need to make sure the shared variable have same access control level.
Choose the macro type
The macro is going to add an initialiser method and a variable, so it must be an attached member macro. Hence the following
// The macro definition
@attached(member, names: named(init), named(shared))
public macro Singleton() = #externalMacro(module: "Macros", type: "Singleton")

// The macro expansion logic
public struct Singleton: MemberMacro {}
Implement the expansion method
public static func expansion<Declaration: DeclGroupSyntax,
                                 Context: MacroExpansionContext>(of node: AttributeSyntax,
                                                                 providingMembersOf declaration: Declaration,
                                                                 in context: Context) throws -> [DeclSyntax] {
        guard [SwiftSyntax.SyntaxKind.classDecl, .structDecl].contains(declaration.kind) else {
            throw MacroDiagnostics.errorMacroUsage(message: "Can only be applied to a struct or class")
        }
        let identifier = (declaration as? StructDeclSyntax)?.identifier ?? (declaration as? ClassDeclSyntax)?.identifier ?? ""
        var override = ""
        if let inheritedTypes = (declaration as? ClassDeclSyntax)?.inheritanceClause?.inheritedTypeCollection,
           inheritedTypes.contains(where: { inherited in inherited.typeName.trimmedDescription == "NSObject" }) {
            override = "override "
        }

        let initializer = try InitializerDeclSyntax("private \(raw: override)init()") {}

        let selfToken: TokenSyntax = "\(raw: identifier.text)()"
        let initShared = FunctionCallExprSyntax(calledExpression: IdentifierExprSyntax(identifier: selfToken)) {}
        let sharedInitializer = InitializerClauseSyntax(equal: .equalToken(trailingTrivia: .space),
                                                        value: initShared)

        let staticToken: TokenSyntax = "static"
        let staticModifier = DeclModifierSyntax(name: staticToken)
        var modifiers = ModifierListSyntax([staticModifier])

        let isPublicACL = declaration.modifiers?.compactMap(\.name.tokenKind.keyword).contains(.public) ?? false
        if isPublicACL {
            let publicToken: TokenSyntax = "public"
            let publicModifier = DeclModifierSyntax(name: publicToken)
            modifiers = modifiers.inserting(publicModifier, at: 0)
        }

        let shared = VariableDeclSyntax(modifiers: modifiers,
                                        .let, name: "shared",
                                        initializer: sharedInitializer)

        return [DeclSyntax(initializer),
                DeclSyntax(shared)]
    }
The code above is pretty straightforward. We have done three things:
- Create the
initializer: this is done by the first line of code in the method. - Create
sharedvariable. For this, we need to firstly decide if we needpublicaccess level control. Then create thestaticsharedvariable. - If the type with
publicaccess level, we addpublicto thesharedinstance as well.
Run unit test
Run unit test now, it will succeed like below
Test macro in client code
In test client main.swift file, we can verify the macro. Right click the @Signleton macro name and choose “Expand Macro” like below.
Select “Expand Macro” menu item
The expanded code will like this:
The expanded macro code
Final touch — Handle Exception
So far we have covered all the happy flow for this Singleton macro. It works fine if we apply it to a struct or a class type. But what if we apply it to an enum definition? Well, this macro still expands the code to add init method and shared variable. But of course it wouldn’t compile. Ideally we should handle this misusage using Exception or Diagnostic . But since this article is focused on getting familiar with the Macro development workflow, let’s ignore this for now.
Use the Singleton Macro in an Xcode project
After having verified correctness of the macro, it’s time to use it in a real project.
First add package dependency to the Xcode project like below:
Secondly, we import this package and use the macro like below:
If we try to compile the project now, we will get a prompt like this to ask the confirmation to use this macro.
After Trust & Enable the macro, the code will compile. Meanwhile, we can expand the macro to verify it like below:
Use the Singleton Macro in a Swift Package project
If the project is a swift package, we need to do the following:
- Add package dependency
.package(url: "https://github.com/ShenghaiWang/SwiftMacros.git", from: "1.0.0")
- Add the dependency into target that uses the macro
.executableTarget(name: "Client", dependencies: ["SwiftMacros"])
- In the source code that belong to that target, import the package and use it, which is the same as in Xcode projects.
In this article, we have gone through the process of developing a new Swift Macro by implementing this Singleton Macro(Please find the full source code here.). We have left some details on purpose so that we can focus on the workflow first. Hope it would help to get you start. The following articles will move on to each type of the Swift Macros and explain them in detail.
Sharing is caring!